
Welcome back to part two of our DevOps series. This time, we’re rolling up our sleeves to dive into the DevOps lifecycle—starting with the Planning phase. It’s here that ideas take shape, collaboration kicks off, and we start laying the foundation for delivering a high-quality SaaS application using DevOps practices.
Before we dive in, be sure to catch up on part one of this series if you haven’t already. We unpack the fundamentals of DevOps, walk through its key phases, and set the stage for everything we’re about to explore. Trust me—it’s worth the quick read.

Let’s start by exploring the Plan phase in more detail. This stage is about defining objectives—what we’re building and why it matters. In true Agile fashion, we want to break down upcoming work into small, manageable chunks, ideally pieces that can be completed in a few days to a week. Smaller work units are easier to iterate on, deliver, gather feedback for, and adjust accordingly before the cycle continues.
Collaboration begins immediately between Development and Operations in this phase. For example, if we’re introducing a new feature that reads content from a database, Operations should be involved early to assess requirements on their end: What kind of database will we need? What level of throughput should it support? What availability requirements must be met? These conversations need to happen up front.
Planning also helps us identify risks, uncover bottlenecks, and map out dependencies before they can derail progress. Suppose developers need to store a large number of new user records to support a feature—this may require increased storage capacity. Anticipating and coordinating around challenges like this is exactly what the Plan phase is about.
An Agile workflow like Scrum or Kanban can be incredibly helpful and complementary to a DevOps approach. DevOps grew out of Agile principles, and the synergy between the two is powerful. Using the structured iterations of Scrum or the continuous flow of Kanban helps define how work moves through the system. These frameworks go far beyond basic task management—they’re key players in our planning process.
Regardless of the Agile methodology chosen, the goal is to do “just enough” planning. In contrast to Waterfall approaches, we don’t want to map out every last detail upfront. Instead, we iterate, learn as we go, and adjust course as needed. Planning features in detail two months in advance often results in wasted effort—requirements evolve, and so should our plans. Aiming to plan no more than a couple of weeks ahead ensures we’re staying agile, while also keeping our long-term direction in sight with high-level outlines that we refine as we go.
Now that we’ve explored the purpose and mindset of the Plan phase, let’s discuss how we’ll implement it for our SaaS application.
Tools and Processes for the Plan Phase
- Choose an Agile methodology like Kanban or Scrum to structure our workflow
- Set up work item tracking, build a backlog, and populate it with work items
- Define our SaaS application’s initial design and requirements, and begin breaking this into trackable work
- Use visual tools to manage work in progress and completed tasks
Agile Methodology
Both Scrum and Kanban are excellent Agile frameworks. I’ve used both extensively, and each brings unique strengths depending on the project environment.
Scrum focuses on short “sprints” of work, typically 1 to 4 weeks in length. Work is planned at the beginning of each sprint and remains fixed during it. Scrum also includes structured ceremonies like the daily standup, sprint planning, sprint review, sprint retrospective, and backlog refinement. A dedicated Scrum Master helps facilitate these ceremonies, coaches the team in Scrum principles, and clears obstacles while shielding the team from scope creep and unrealistic demands.
Kanban, by contrast, is built around continuous flow. It uses a visual task board with stages represented as columns, and work moves from one stage to the next based on available team capacity. It emphasizes a steady, adaptive pace rather than timeboxed cycles.
Scrum is a powerful fit for teams needing predictability and regular cadence—perfect for evolving software development projects. Kanban, however, truly shines in dynamic environments where priorities shift frequently. Its flexibility is a huge advantage for operations and support teams—or any team that needs to pivot quickly.
For our SaaS project, Kanban is a great fit. Its capacity-based flow and ability to easily reprioritize will suit our needs perfectly.
Work Item Tracking
There’s no shortage of great tools for work item tracking and Agile project management. Popular options include Jira, GitHub, and Azure DevOps. Each one offers robust customization, helpful templates, and powerful integration with the rest of your toolchain.
For this project, we’ll use Azure DevOps. Not only does it offer deep integration with other Azure services we’ll use later, but it also includes source control and CI/CD pipeline features that will come in handy during the build, test, and deploy phases.
Setting Up Work Item Management with Azure DevOps
Create an Azure DevOps Organization
First, we need to create an Azure DevOps organization—this acts as the container for all projects we’ll work on. I already had a Microsoft account, so I used it to sign in here.
From there, I selected New Organization, provided a name, chose a hosting region, and completed a quick CAPTCHA. Within seconds, the organization was ready—time to create a project.

Create a Project
With the organization in place, we can now create a project. Projects in Azure DevOps house work items, repositories, and more. While setting up the project, we configure name, description, and visibility. Expanding the Advanced section provides additional setup options.
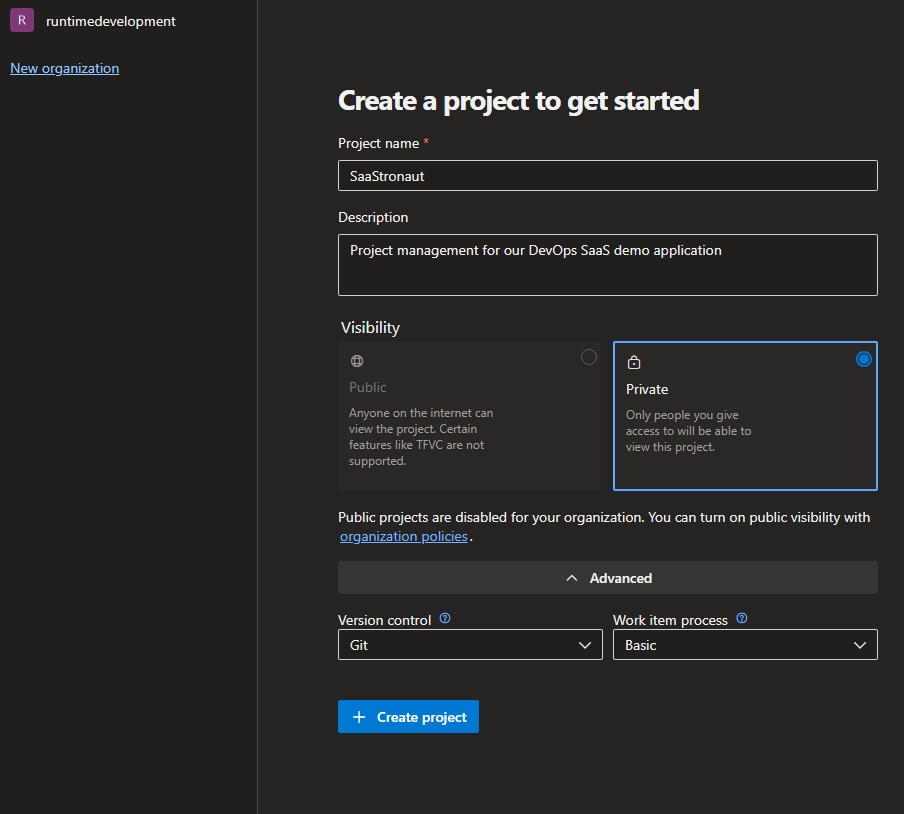
Version Control For a new project, Git is the clear choice. It’s the industry-standard for distributed version control and what we’ll be using here.
Work Item Process The work item process determines our workflow within Azure DevOps. There are four default options, each tailored to different team needs. The key differences lie in workflow states, transitions, and available work item types.
You can check out the full comparison here.
Both Basic and Agile would serve us well. However, the Agile process offers a richer set of work item types, which will help us better demonstrate features throughout this phase and beyond. So that’s what we’ll choose to kick things off.
With our project in place, let’s take a moment to explore the different work item types provided by the Agile process template in Azure DevOps.
Work Item Types in Agile
- Epic – This is the highest-level work item. An Epic encapsulates a broad business objective or theme, typically representing a significant body of work. For example, in a fitness app, an Epic might be “Enable users to monitor their physical activity and wellness.” Epics are made up of Features.
- Feature – One level below an Epic, a Feature represents a specific user-facing capability or function that delivers value. Continuing with our fitness app, a Feature might be “Activity tracking and visualization.” Features are composed of User Stories.
- User Story – These are the actionable, working-level items that guide development. User Stories are expressed from the perspective of a specific user persona. For instance: “As a fitness enthusiast, I want to view a weekly chart of my step count so that I can track my physical activity trends and stay motivated.”
- Task – Tasks break down User Stories into smaller units of effort. They’re useful for distributing workload across team members and tracking specific technical steps.
- Bug – A Bug typically parallels a User Story in scope but focuses on correcting defects or broken behavior rather than delivering new functionality.
Now that we understand how work items help structure our planning, let’s look at the SaaS application we’ll build for this demo—and then break it down into work items using the Epic > Feature > User Story model.
Introducing SaaStronaut
SaaStronaut is a web portal for browsing NASA’s daily image uploads, complete with their associated write-ups. The landing page displays the past week’s worth of photos, each with a brief preview of its text. Clicking on an image brings the user to a full-sized version of the photo and its complete description.
System Architecture Overview
A containerized backend service runs on a schedule, fetching daily images from NASA’s RSS feed and saving them to Azure Storage. This process triggers a Function App that generates thumbnail versions of the images and stores them alongside the originals. The accompanying text descriptions are stored in Cosmos DB with references to their image assets. An App Service-hosted Web API serves this data to a Blazor front-end, where everything is rendered in a clean, user-friendly experience.

Mapping the Application to Work Items
Taking stock of the application’s functionality, we can break it down into a single Epic with three Features, each containing three User Stories.
Epic: Display NASA’s Daily Images in an Engaging Web Portal
Feature 1: Curated Landing Page with Daily Thumbnails
Showcase the latest NASA images in a visually rich, browsable format.
User Stories:
- As a space enthusiast, I want to see a grid of thumbnails from the past 7 days so I can quickly scan recent NASA images.
- As a user, I want to read a short snippet of each image’s description so I can decide which one to explore further.
- As a returning visitor, I want the most recent image to be visually highlighted so I can quickly spot new content.
Feature 2: Full Image View with Detailed Information
Enable users to explore the images and their background more deeply.
User Stories:
- As a user, I want to click on a thumbnail to see the full-size image and complete description so I can fully appreciate the photo and its meaning.
- As a user, I want navigation controls so I can browse back and forth between daily images without returning to the homepage.
- As an accessibility-conscious user, I want descriptive alt text on each image so the app is friendly to screen readers.
Feature 3: Automated Daily Data Sync from NASA
Build a backend system that ensures the latest NASA data is available each day.
User Stories:
- As a system, I want to fetch the latest NASA image and text from the RSS feed daily so the app stays up to date.
- As a developer, I want the image to be stored in Azure Storage with metadata in Cosmos DB so the API can retrieve it efficiently.
- As a system, I want to generate a thumbnail for each image so the frontend can display lightweight previews.
Using the Work Items page in Azure DevOps, I’ll create each of these items and populate them with important details—like a clear description, acceptance criteria, and priority. This ensures every item is actionable and helps me focus efforts where they matter most.

Linking Work Items for Better Visibility
Azure DevOps allows us to establish meaningful relationships between work items. This includes marking one as a blocker for another, indicating dependencies, or simply grouping related items together. For our purposes, we’ll use parent-child linking to reflect the hierarchy between Epics, Features, and User Stories.

Why User Story Structure Matters
Let’s take a quick moment to call out something that may seem like fluff but plays a crucial role: the structure of a well-crafted User Story.
The template “As a ___, I want to ___, so that ___” might feel formulaic, but it packs serious value. Here’s why:
- “As a ___” – Identifies the who. Whether it’s a casual user, a power user, or even a developer integrating with our API, understanding their persona helps us design with empathy.
- “I want to ___” – Captures the what. This is the capability or solution the user is hoping for.
- “So that ___” – Explains the why. This gives context to the user’s motivation and helps us implement the solution in a meaningful way.
This structure doesn’t just make user needs easier to capture—it drives clarity across design, development, and testing.
With our work items populated, let’s turn our attention to the backlog to get a sense of the journey ahead. While the Work Items view helps us see everything at once and quickly search or filter, the Backlog view is purpose-built for planning and prioritization.
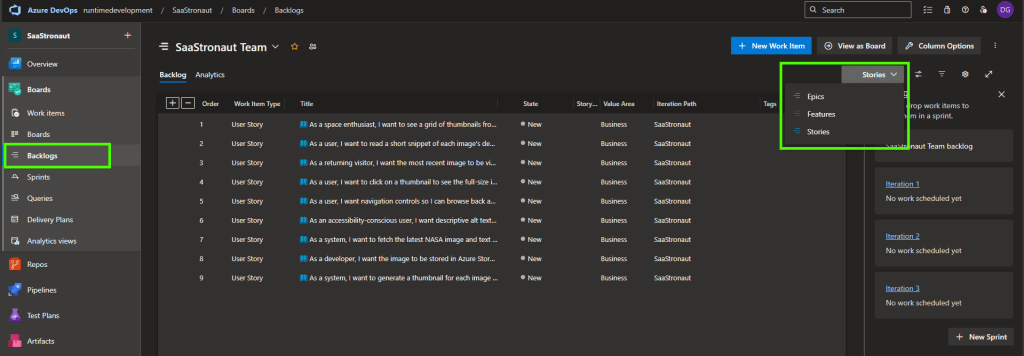
This view allows sorting by various work item types, and turning on “Show Parents” gives us a clear visual hierarchy—great for understanding how our Epics, Features, and User Stories fit together.

From the backlog, we can also create iterations (or sprints) for a Scrum-based workflow and assign items simply by dragging them in. It’s a fast and intuitive way to set up upcoming work. Since we’re following a Kanban-style workflow for this project, we’ll skip sprint planning for now.
Another valuable tool in this view is the Analytics tab. We’ll return to this once we have work in motion, but for now, just know it gives us insight into cumulative flow and team velocity—both vital for tracking our delivery rhythm and efficiency.
Visualizing Progress with the Kanban Board
Next, we visit one of my favorite spots: the Boards page. This is where we visualize the flow of work Kanban-style. Just like in the backlog, we can filter by work item types—but here, I usually stick to User Stories to focus on the primary units of value delivery.
The board is highly customizable. You can:
- Create custom columns to reflect your team’s unique stages
- Add color-coding rules for visual cues
- Adjust which fields appear on each card for quick-glance context
While the default setup works quite well, I like to add a few tweaks to make our tracking even more actionable.
Customizing with Style Rules
Let’s add two style rules to highlight work items that have been active for a while:
- Turn the card yellow if it’s been active for more than 5 days
- Turn it red if it’s been active for more than 10 days
These visual cues help surface slow-moving items that may be blocked or simply need a nudge. They’re especially helpful in team settings where work in progress is spread across multiple contributors.
To set them up:
- Open Board settings via the gear icon in the upper-right corner.
- Navigate to the Styles section.
- Add your two rules—place the 10-day rule above the 5-day rule, since only the first matching rule will apply.

Each rule checks:
- Whether the “Activated Date” is more than X days ago (@Today – X)
- Whether the item is still not in a “Closed” state
If both conditions are true, the color is applied.
The Activated Date is managed by Azure DevOps and is automatically populated when a work item moves into an In Progress state. If you move the item back to New, the field clears—making it perfect for tracking exactly when work begins.
By excluding Closed items from these rules, we ensure completed work doesn’t get flagged—our focus remains on what’s currently in flight. The result? A visual system that surfaces the work needing attention: yellow for lingering items, red for urgent outliers.
Wrapping Up the Planning Phase
With that, we’ve built a solid foundation for our DevOps lifecycle and completed a full first pass through the Plan phase. We:
- Selected an Agile methodology that suits our project
- Created an Azure DevOps organization and project to keep things structured
- Outlined the architecture and goals for our SaaStronaut application
- Captured the work in a series of Epics, Features, and User Stories
- Customized our Kanban board to improve tracking and visibility
Our next stop is the Code phase. We’ll explore source control with Git, dive into our application’s codebase, and look at branching strategies to help us manage collaboration and releases effectively.
Thanks for following along—I hope you’re enjoying the journey as much as I am. Until next time, stay Agile and keep iterating forward!
