
I had the chance to attend Microsoft Build 2026 in person this week, and as expected, it was equal parts overwhelming and energizing. There’s always more content than you can reasonably absorb in a few days, but being there in person gave a much clearer sense of direction—not just what’s being announced, but what Microsoft is actually prioritizing moving forward.
Instead of trying to summarize everything, I wanted to capture the themes and technologies that stood out to me. These are the areas I’m most interested in exploring further, especially in the context of personal projects and how I like to build and operate systems.
Copilot Is Expanding Into Real Workflows
Copilot continues to show up everywhere, but what feels different this year is how deeply it’s integrating into actual developer workflows instead of sitting on the edge.
Bringing GitHub Copilot into Windows Terminal is a great example of this shift. Rather than forcing you into an IDE, it meets you where you’re already doing work—writing scripts, running commands, and managing environments. It effectively adds a conversational layer on top of the command line, which could reduce friction when working across unfamiliar tools or remembering complex syntax.
https://developer.microsoft.com/blog/making-windows-terminal-awesome-with-github-copilot-cli
The GitHub Copilot CLI builds on that idea, allowing you to translate natural language into commands and scripts directly in your shell. For someone who spends a lot of time in the terminal, this could be a meaningful way to accelerate experimentation and iteration without breaking flow.
https://github.com/features/copilot/cli
The broader GitHub Copilot App signals that Copilot is becoming more of a persistent companion rather than a feature tied to a single surface. This feels like an early step toward a unified AI assistant that follows you across tools and contexts.
https://github.com/features/ai/github-app
There are also some important shifts happening in code quality workflows. Copilot code reviews for Azure Repos introduce automated feedback directly into pull requests, which could significantly reduce turnaround time while still allowing humans to focus on higher-level concerns.
https://learn.microsoft.com/en-us/azure/devops/repos/git/copilot-code-reviews?view=azure-devops
On the debugging side, Copilot-assisted diagnostics in Visual Studio are particularly interesting. Instead of just generating code, Copilot is now helping analyze performance issues and explain system behavior. That feels like a more meaningful use of AI—augmenting understanding rather than just output.
https://devblogs.microsoft.com/visualstudio/delegate-the-analysis-not-the-performance/
The Terminal Is Becoming a Smarter Interface
The terminal is clearly getting more attention, and not just incremental improvements.
The Intelligent Terminal initiative is an early look at what happens when the command line starts to understand context. This includes awareness of command history, environment state, and potentially even intent—turning the terminal into something closer to an interactive assistant without losing its composability.
https://devblogs.microsoft.com/commandline/announcing-intelligent-terminal-version-0-1/
For me, this is compelling because the terminal has always been a power tool. Making it more accessible and intelligent—without removing its flexibility—could significantly change how we approach both development and operations work.
Developer Environments Are Becoming Reproducible
Setting up development environments has always been one of the most time-consuming parts of starting or revisiting a project.
Windows Developer Configs with WinGet aims to solve this by making environment setup declarative. Instead of manually installing tools and configuring settings, you define your environment in a configuration file and let the system build it for you. The Microsoft Developer team has been hard at work putting together a collection of preconfigured setups. This is a big step in helping adoption, and serving as a kick off point for further customization.
https://learn.microsoft.com/en-us/windows/dev-configs/
This is something I’m particularly interested in applying to personal projects. Being able to quickly spin up a consistent environment—or rebuild one after a long gap—removes a lot of friction and makes experimentation easier. It also aligns well with the broader “everything as code” mindset.
Data and AI Continue to Converge in Fabric
Microsoft Fabric continues to blur the lines between data engineering, analytics, and AI.
The introduction of a GPU-accelerated Fabric Data Warehouse points to a future where high-performance analytics workloads are more tightly integrated into managed platforms. Using GPU acceleration could dramatically improve performance for certain types of queries and model-driven workloads.
https://community.fabric.microsoft.com/t5/Fabric-Updates-Blog/A-new-analytics-frontier-GPU-accelerated-Fabric-Data-Warehouse/ba-p/5191598
The Rayfin SDK adds another layer by positioning itself as an AI-first development framework for data applications. It aims to simplify how you build, deploy, and govern intelligent systems that operate on large datasets.
https://community.fabric.microsoft.com/t5/Fabric-Updates-Blog/Introducing-Rayfin-A-new-AI-first-way-to-build-deploy-and-govern/ba-p/5191676
These changes reinforce a trend I’ve been thinking about—data pipelines and AI models are no longer separate concerns. They’re becoming part of the same system design, and tools are starting to reflect that.
AI Security and Governance
As AI becomes more embedded in applications, securing it becomes critical.
The Mdash AI security efforts focus on protecting not just code, but also models and agent interactions across the development lifecycle. This includes things like supply chain security, data protection, and safe deployment practices.
https://www.microsoft.com/en-us/security/blog/2026/06/02/microsoft-build-2026-securing-code-agents-and-models-across-the-development-lifecycle/
This is something I think is easy to overlook in smaller projects, but increasingly important. As soon as you integrate AI components, you’re dealing with new types of risk that traditional security models don’t fully cover.
Resiliency Is Becoming More Automated
Reliability and resilience continue to be key focus areas in Azure.
The Azure Infrastructure Resiliency Manager introduces tooling to help design and validate resilient architectures more systematically. It provides guidance and validation around failure scenarios, helping ensure systems are prepared for real-world conditions.
https://techcommunity.microsoft.com/blog/reliability-and-resiliency-in-azure/announcing-azure-infrastructure-resiliency-manager-public-preview/4523710
The Resiliency Agent complements this by offering automated recommendations and insights. Instead of manually reviewing architecture decisions, you get continuous feedback on how to improve reliability.
https://learn.microsoft.com/en-us/azure/resiliency/goals-recommendations-use-agent
This aligns closely with how I like to approach systems—designing for failure from the start rather than reacting to it later.
Models and Local AI Exploration
Microsoft continues to expand its AI model ecosystem.
The release of several new AI models shows ongoing investment in improving capability, efficiency, and specialization.
https://microsoft.ai/news/building-a-hillclimbing-machine-launching-seven-new-mai-models/
At the same time, efforts like OpenClaw on Windows demonstrate a push toward making AI workloads more accessible locally, with improved security.
https://www.theverge.com/ai-artificial-intelligence/941870/microsoft-makes-it-more-secure-to-run-openclaw-on-windows
This balance between cloud and local AI is something I’m increasingly interested in—especially for experimentation and privacy-conscious scenarios.
Platforms for Innovation
There were also a couple of broader initiatives that stood out.
Microsoft Discovery appears to bridge the gap between research and product, making advanced capabilities more accessible to developers.
https://azure.microsoft.com/en-us/blog/announcing-microsoft-discovery-general-availability-and-microsoft-discovery-app-preview/
And CopyFlag, the Imagine Cup winner, is a great example of how these technologies are being applied in meaningful ways. This is a brilliantly inspiring startup project and I am very excited to see where it goes.
https://techcommunity.microsoft.com/blog/studentdeveloperblog/announcing-the-2026-imagine-cup-world-champion/4524686
https://www.copyflag.com/
It’s always useful to see what people are actually building—it helps ground all of these platform capabilities in real-world impact.
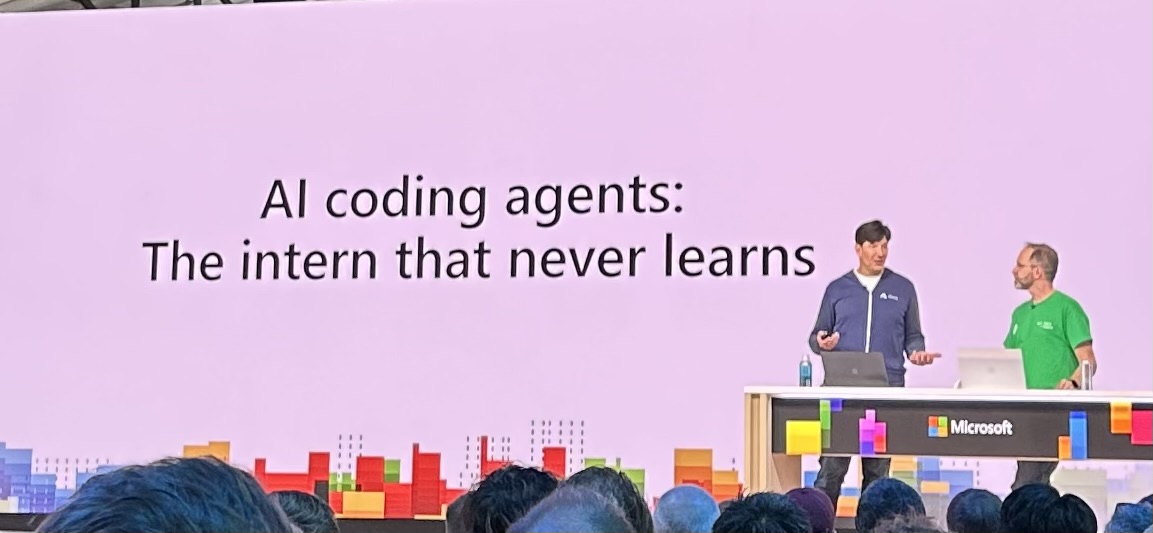
The Human Element: AI With a Human in the Loop
One session that stood out to me in particular featured Mark Russinovich and Scott Hanselman, and focused on how agents are reshaping software engineering:
What I appreciated most about this session is how grounded it was. There’s a lot of excitement right now around AI-driven development, but this talk pushed back on the idea that we can simply “vibe” our way through building software. That approach might work in small, personal scenarios, but it quickly breaks down when you start dealing with real-world complexity, reliability, and scale.
One analogy that really stuck with me was the idea of treating AI like an intern. It’s capable and often impressively productive, but it lacks context and tends to optimize for being helpful—even when that leads it in the wrong direction. That can result in solutions that look correct but introduce subtle issues, which reinforces the need for human validation and oversight at every step.
They also highlighted something that I think doesn’t get talked about enough: the risk of cognitive offloading. If we rely too heavily on AI to do the thinking for us, we start to lose the ability to reason through problems ourselves. That “cognitive debt” builds over time, and ultimately makes us less effective engineers. The takeaway here is that we still need to struggle with hard problems and build intuition—the kind that AI can’t provide.
The most impactful idea for me, though, was the preceptor model. Borrowed from the medical field, this approach focuses on pairing less experienced developers with more experienced ones in a guided, hands-on environment. AI becomes part of that loop, enabling faster feedback and exploration, but always within a structure where mentorship and human judgment are central.
That message was particularly meaningful because it directly addresses the future of early-career developers. Rather than removing opportunities, it emphasizes the need to invest more intentionally in developing people—using AI as a tool to accelerate learning, not replace it.
Hearing this from leaders like Russinovich and Hanselman was genuinely encouraging. It shows that Microsoft is thinking beyond just capability and features, and is actively considering how these tools shape the profession. More importantly, it suggests they are working to apply these ideas internally—leading by example and reinforcing the importance of mentorship, learning, and human judgment in an AI-driven world.
For me, this reinforces a principle I want to carry forward: the goal isn’t to remove humans from the loop—it’s to build better loops. Systems where AI enhances how we learn, decide, and build, while keeping humans firmly engaged and accountable.
Final Thoughts
My biggest takeaway from Build 2026 is that we’re moving toward a more integrated ecosystem:
- AI is embedded directly into workflows
- The terminal and local tooling are evolving in meaningful ways
- Data, infrastructure, and intelligence are converging
- Developer experience is shifting toward higher-level abstractions
For my own work, this translates into a few areas I want to explore further:
- Pushing more workflows into the terminal with AI assistance
- Experimenting with AI-augmented development loops
- Treating data and AI as foundational components in projects
- Continuing to focus on resiliency and system design
If you want to explore more of the sessions from Build, Microsoft has made the full catalogue of recordings available on YouTube. You can find the whole playlist here.
I’ll be digging into several of these areas over the coming weeks, especially where they intersect with how I build and experiment in my own projects. If any of this caught your attention, I’d recommend picking a topic and exploring it yourself—there’s a lot here that’s easier to understand by doing than by reading.
