
It’s That time again—welcome back to our ongoing journey through the DevOps lifecycle. In our last article, we kicked off the Code phase, exploring how purposeful planning translates into structured development.
If you’re just tuning in, feel free to catch up on the earlier posts in the series so you can follow the full arc.

In Part One, we unpacked the foundational ideas behind the Code phase of the DevOps lifecycle—exploring how version control, branching strategies, style enforcement, and Infrastructure as Code (IaC) all contribute to a more collaborative, automated, and resilient development process. Now it’s time to bring those concepts to life.
In this follow-up, we’ll shift gears from theory to implementation. Using our SaaStronaut project as the playground, I’ll walk through how these principles take shape in a real-world DevOps workflow. From setting up micro-repositories and enforcing branch policies, to linting code with EditorConfig and codifying infrastructure with Bicep, we’ll see how each piece fits into the broader DevOps puzzle.
This isn’t just about writing code—it’s about building a system where every commit, every configuration, and every deployment is intentional, traceable, and scalable. So let’s roll up our sleeves and dive into the practical side of the Code phase.
Micro-Repositories for our Micro Services
Let’s swing back to our Git repositories. For this project, I’m leaning fully into the microservices pattern and extending that into a micro-repository structure. Each microservice in our system will live in its own repository. Admittedly, this is overkill for a small-scale demo like SaaStronaut, but it’s a great opportunity to showcase the architecture.
By isolating each service in its own repo, teams gain ownership over their codebase and CI/CD workflows. This decentralization fosters faster deployments, clearer accountability, and the ability to experiment without impacting unrelated services—hallmarks of a DevOps culture.
Creating a new repository is straightforward. Within our Azure DevOps project, we select Repos from the left-hand menu. Expanding the repository dropdown reveals the option to create a new repository.

We give our repository a name, optionally add a README or a .gitignore file, and click Create.

Enforcing Best Practices with Branch Policies
Azure DevOps offers several features to help maintain repository hygiene. One of the most powerful tools is the branch policy, which lets us define rules for how code enters our branches—especially the main branch.
Branch policies aren’t just guardrails—they’re a DevOps enabler. By requiring peer reviews, linked work items, and build validation before merging, we create a culture of shared responsibility and continuous feedback. These policies automate quality checks and encourage collaboration, ensuring that every change is traceable, tested, and aligned with business goals.
We can also require that pull requests have a minimum number of reviewers, and prevent users from approving their own work. Another useful option is linking pull requests to work items, ensuring that every change is traceable back to our planning process—perfect for verifying that all acceptance criteria have been met.
Additionally, we can enable build validation, which ensures that an associated Azure DevOps pipeline runs successfully before a pull request is completed. This might include unit tests, deployment steps, or regression tests—helping us keep broken code out of main.
Since I’m using a GitHub Flow-based branching strategy for SaaStronaut, pull requests will be central to merging feature branches into main. Let’s set up a branch policy to support this.
Expanding the repo selector again, we choose Manage Repositories at the bottom. This takes us to a page where we can configure settings, policies, and security options. By default, we land at the root level, where changes apply to all repositories in the project. If we want to apply settings to a specific repository, we can select it from the list and configure options accordingly.

For our purposes, we’ll apply a policy to all repositories. I select the Policies tab and click to add a branch policy.
We can apply policies to the default branch (main) or to any branches using a matching pattern. For now, we’ll target the default branch.
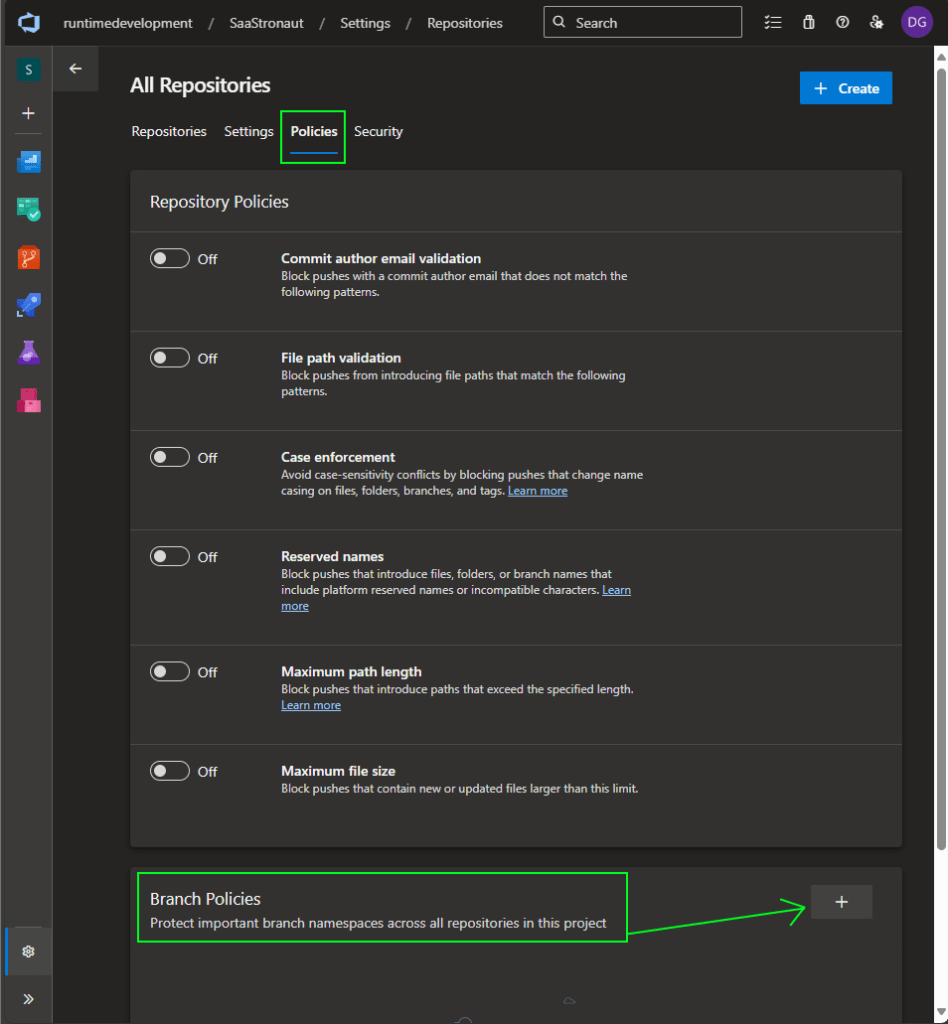

We’re presented with a list of available policies. I’m enabling three key ones:
- Minimum number of reviewers
- Check for linked work items
- Check for comment resolution
These are solid defaults that promote peer review and collaboration—core values in this phase. (Since I’m a team of one for this demo, I’ll allow self-approval, but in a real-world scenario, I’d disable that.)
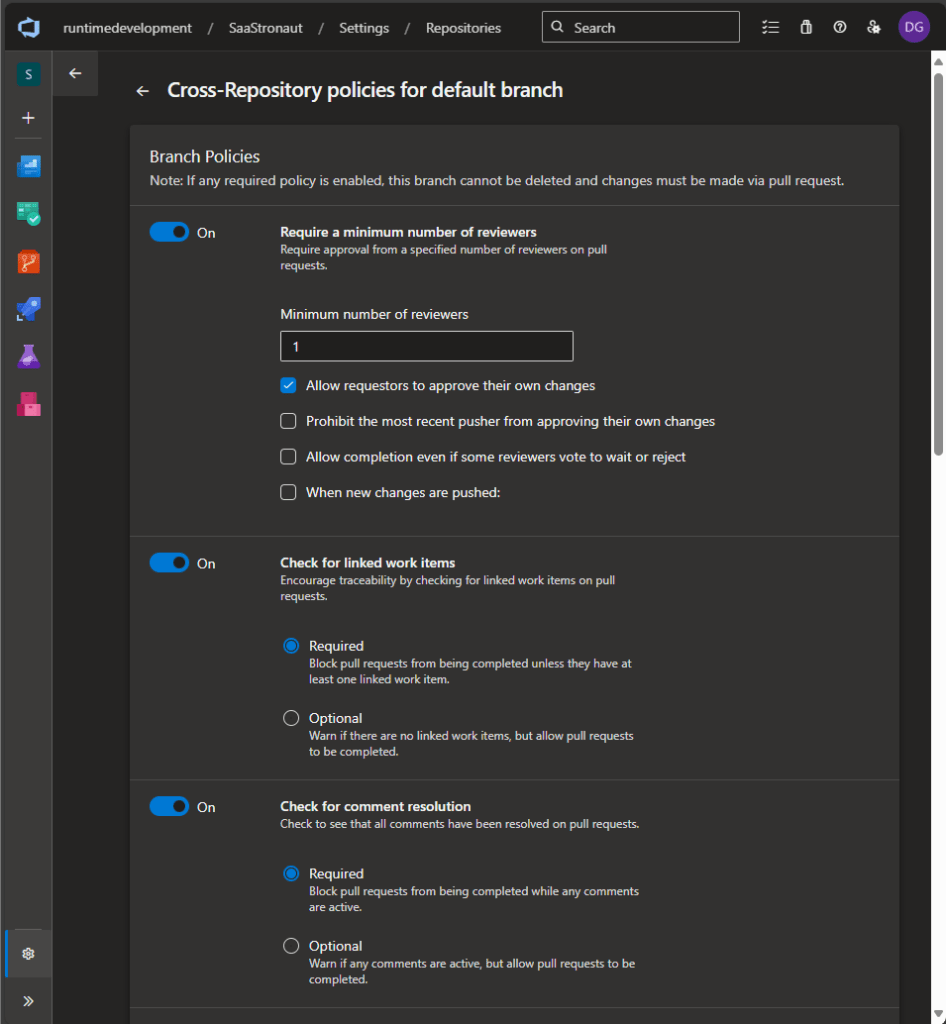
We’ll skip build validation for now (we’ll revisit it in the build phase), but I’ll configure the policy to automatically add reviewers. In my case, that’s just me—so this saves a few clicks.

In a real-world setup, you might automatically add a team lead as an optional reviewer, or configure rules based on folder paths. For example, changes to a folder containing data access code could trigger a review by the subject matter expert for that area. Azure DevOps offers plenty of flexibility to tailor policies to your team’s needs.

With those policies in place, I’m ready to clone my repositories and start coding!
Linking Work Items to Code
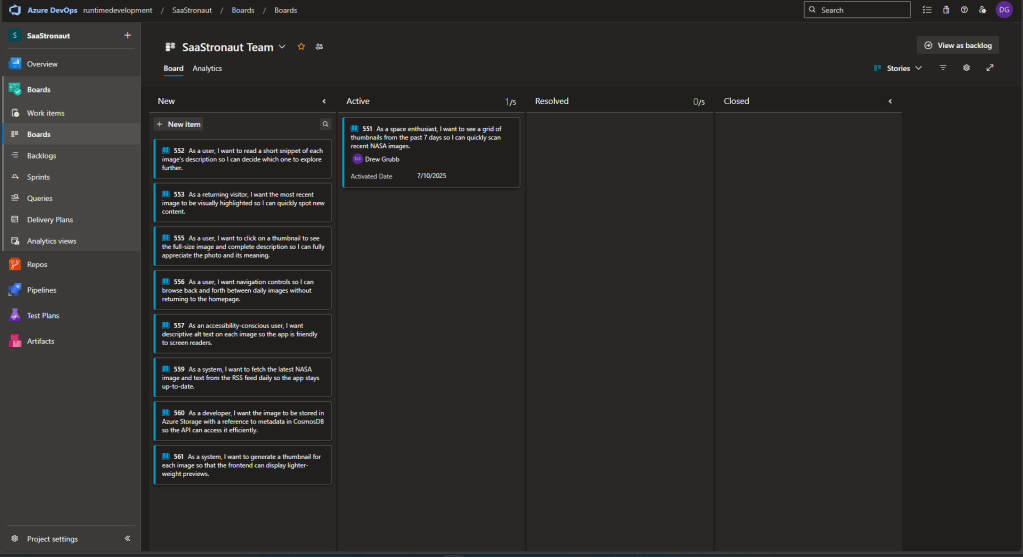
One of the branch policies we enabled requires that pull requests be linked to work items. This is a great time to head back to our board, grab the first work item, and assign it to ourselves.
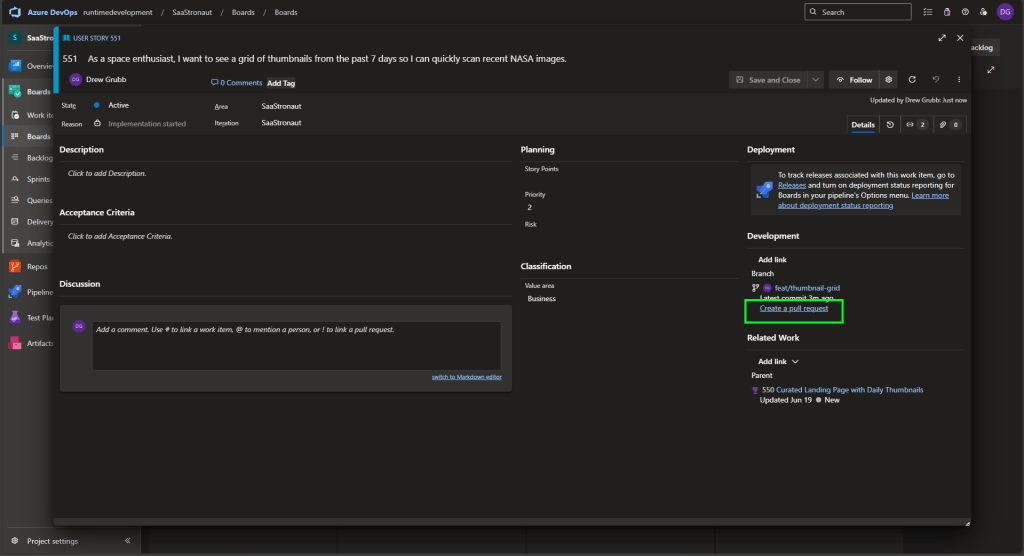
Looking at our Kanban board (set to view user stories), we see our prioritized list of work items. At the top is our task to display a grid of thumbnails for NASA photos. Let’s drag it to the Active column—this automatically assigns it to us.
We can also open the work item and create a new branch directly from it. This links the branch to the work item, keeping a clean history of our development. If we created the branch another way, we could manually link it here.
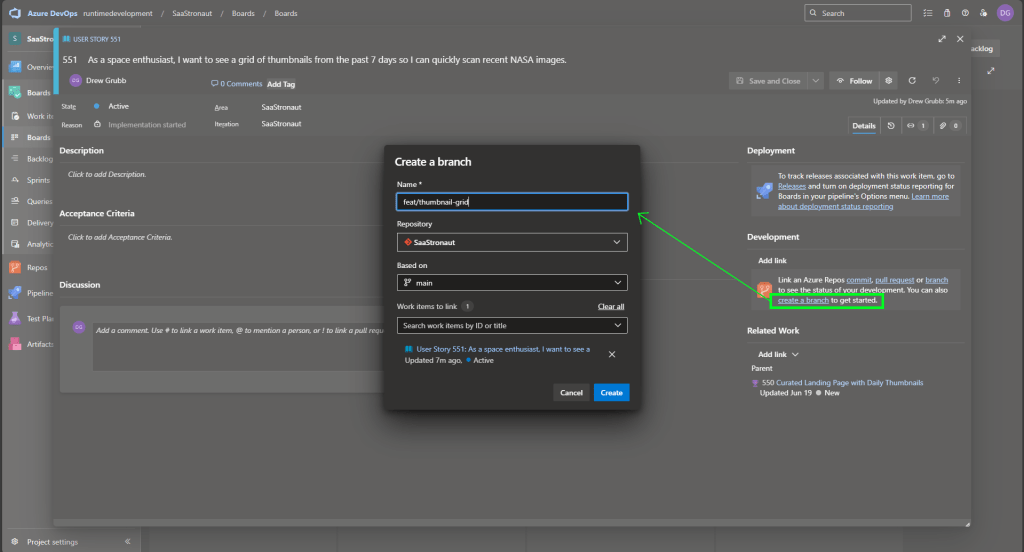
Once the branch is linked, we get a convenient option to create a pull request—again, linking everything together. This gives us a unified view of our work: the work item, the branch, and the pull request. Later, we can associate this with a build pipeline to monitor the success of our build and test processes.
Keeping Code Clean with Linting and EditorConfig
Before we dive deep into development, it’s worth setting up guardrails to keep our codebase clean and consistent. Linting tools help catch stylistic and structural issues early, making code easier to read, review, and maintain.
There are plenty of options—SonarQube, ReSharper, ESLint, and others—but for enforcing style across editors, EditorConfig stands out. It’s a simple, vendor-neutral file format supported by both Visual Studio and VS Code, allowing teams to define and share coding conventions regardless of their IDE.
In a DevOps workflow, consistency isn’t just cosmetic—it’s foundational. EditorConfig helps automate style enforcement across environments, reducing merge conflicts and streamlining code reviews. By embedding these rules into the development pipeline, we shift quality left and free developers to focus on solving real problems, not debating tabs vs. spaces.
Our goal here is to create an .editorconfig file tailored to our project, configure it in both Visual Studio and VS Code, and use it to lint for stylistic mismatches. With automatic corrections enabled, we’ll ensure our code stays aligned with team standards from the first keystroke to the final commit.
Setting Up EditorConfig in Visual Studio
We’ll start in Visual Studio, which offers a helpful GUI for reviewing and adjusting EditorConfig settings.
Within our solution or project, we can add a new EditorConfig file just like any other item: Right-click → Add → New Item. Searching for “EditorConfig” reveals two templates: an empty file or a .NET conventions file. I’ll choose the .NET template and use the default name .editorconfig.

Opening the file reveals four main sections:
- Whitespace
- Code Style
- Naming Style
- Analyzers
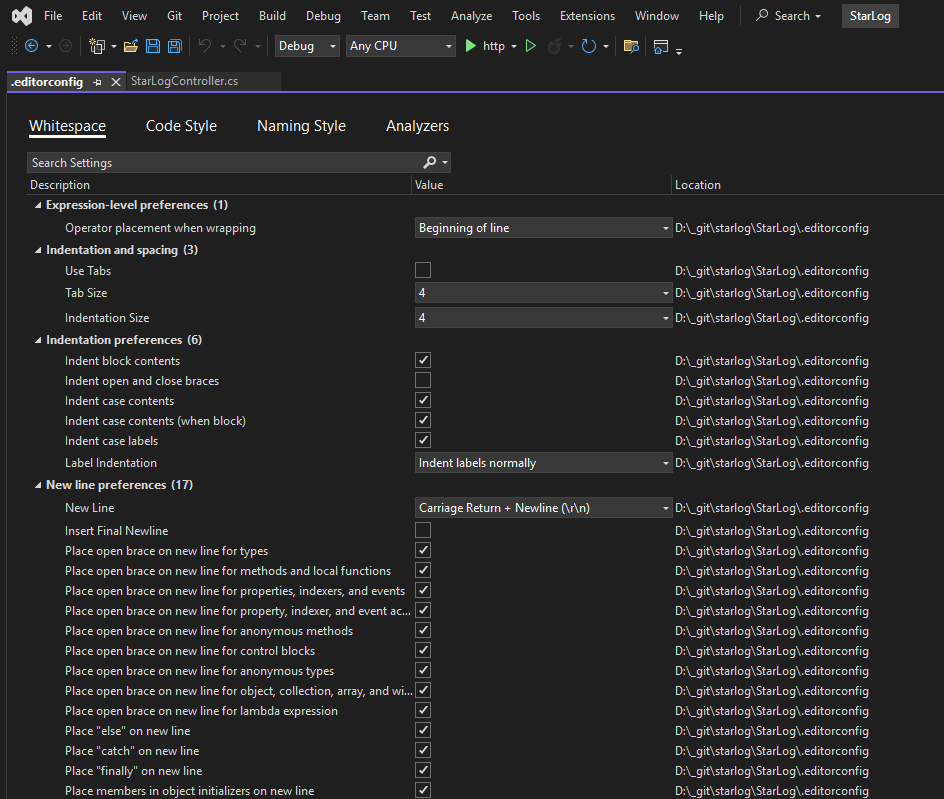
- Whitespace rules control formatting—indentation, spacing, and line breaks—to ensure readability and visual consistency. Whether you’re Team Tabs or Team Spaces, there’s a setting for you.
- Code Style rules guide developers on preferred syntax patterns, like using var vs. explicit types, brace placement, and newline usage. These promote uniform coding practices.
- Naming Style rules enforce conventions for identifiers (e.g., camelCase for variables, PascalCase for classes), helping teams maintain clarity and consistency.
- Analyzers dive deeper, inspecting code for correctness, performance, security, and maintainability. They generate warnings or errors and can directly impact application behavior.
The key distinction: the first three categories shape how your code looks, while analyzers scrutinize how your code works—making them essential for building robust, efficient applications.
Viewing and Extending EditorConfig
Outside of Visual Studio, the EditorConfig file is a plain-text collection of properties that define our rules. You can extend it using:

Let’s start by accepting the defaults and walking through how to use EditorConfig to validate and clean up our code.
Linting from the Command Line
While you can lint code directly in the IDE, we’ll start with the command line—especially since we’ll integrate this into our build pipeline later.
Visual Studio includes the Developer Command Prompt, accessible via the View menu.

From the terminal, we run:
dotnet format .\StarLog.csproj -v detailedThe -v detailed flag gives us more insight into what’s happening. The output shows which files didn’t comply with our style rules and were automatically fixed.
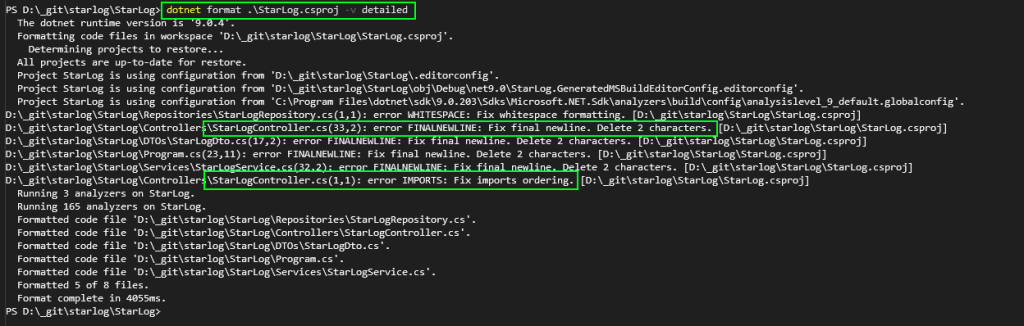
Checking our pending changes in source control, we see the fixes—removing final newlines, reordering imports, and cleaning up whitespace.
Enforcing Style in the Build Process
We can adjust the severity of EditorConfig rules. For example, setting a rule to silent disables it, while setting it to error can cause the build to fail if violated.
To enforce code style during compilation, we modify our .csproj file by adding:
<EnforceCodeStyleInBuild>true</EnforceCodeStyleInBuild>
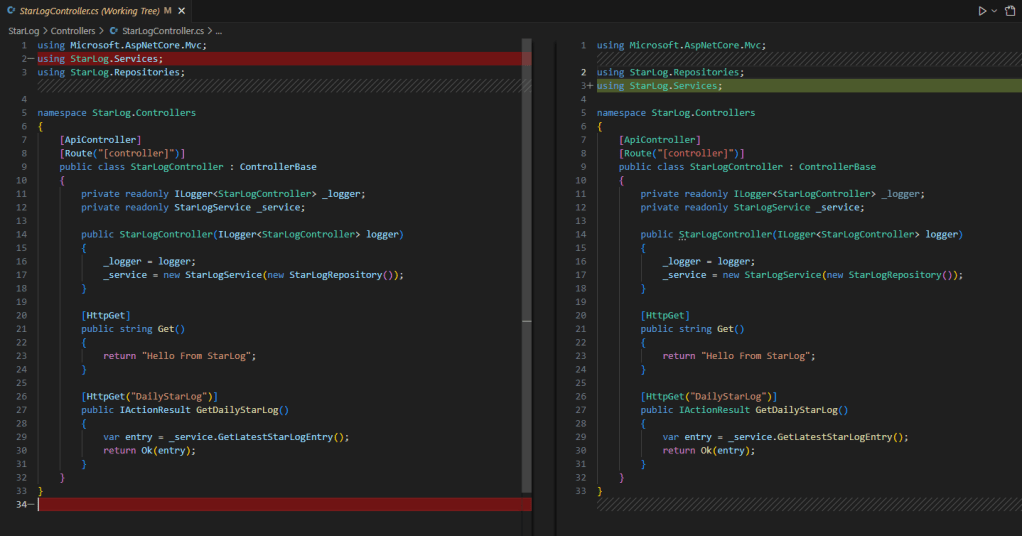
In the StarLog project, I’ve set the rule for var usage to prefer explicit types and raised its severity to error. With build enforcement enabled, the compiler flags violations.

I can fix these manually or rerun the format command to apply automatic corrections. A few seconds later, my code is clean and compiling again.

Adding and Customizing Analyzers
Let’s explore analyzers further. It’s worth noting that the analyzer settings visible in Visual Studio’s GUI aren’t initially present in the EditorConfig file—they’re defaults from the .NET SDK. When we override a severity, the rule is added to EditorConfig.
For example, I changed the severity of CA1031 (“Do not catch general exception types”) to error. This override triggers compiler errors both in the command line and in Visual Studio.


The same warnings and errors appear in VS Code too. No matter which editor I use, EditorConfig keeps my code consistent and clean.
Best of all, we’ll include this linting check in our build pipeline during the Build phase—ensuring every commit meets our standards.
Codifying Infrastructure: Bringing IaC into the DevOps Fold
So far, we’ve explored practical implementations of two core concepts from Part One: micro-repositories to reflect our microservices architecture, and branch policies to support our Git strategy. We also looked at using EditorConfig to define and enforce style guidelines. To wrap up the Code phase, let’s explore one final area of codification: Infrastructure as Code (IaC)—and specifically, how it fits into our repository and development workflows.
What Is Infrastructure as Code?
As discussed in Part One, IaC is about defining infrastructure—networks, servers, databases, and more—using machine-readable code. This allows us to use programmatic tools to create, update, and manage infrastructure, replacing manual configuration with automated, repeatable processes.
For SaaStronaut, I plan to run application components on various Azure platform resources. To leverage IaC effectively, I need a system that interfaces seamlessly with Azure.
Azure offers its own proprietary IaC language called Bicep. Alternatively, I could use Terraform, which supports multiple cloud platforms like AWS and GCP. If I were planning a multi-cloud deployment, Terraform would be a strong choice due to its portability. But since SaaStronaut is Azure-only, I’ll focus on Bicep.
Azure Resource Manager: The Backbone of Azure IaC
Before diving into Bicep, it’s important to understand Azure Resource Manager (ARM)—the deployment and management engine behind Azure. Whether you’re using the Azure Portal, CLI, PowerShell, REST API, or Bicep, all tools ultimately interface with ARM.
ARM supports declarative JSON templates (known as ARM templates) to define resources. The declarative model is key: it allows us to specify what infrastructure we want, not how to create it. ARM handles the orchestration.
For example, if I define a storage account in a Bicep or ARM template, ARM will either create it, update it to match my desired state, or do nothing if it already matches. I don’t need to check the current state or write conditional logic—ARM takes care of it.
Contrast this with scripting in PowerShell, where I’d need to:
- Check if the resource exists
- Compare each property
- Update mismatches
- Create the resource if missing
That’s a lot of conditionals. Declarative IaC eliminates that complexity.
Why Bicep?
Bicep is the evolution of ARM templates (get it—biceps are part of arms?). While ARM templates use verbose JSON, Bicep offers a cleaner, more human-friendly syntax similar to YAML. It supports conditions, loops, and modules for code reuse.
When deploying with Bicep, the CLI converts your .bicep file into an ARM template behind the scenes and submits it to Azure Resource Manager.
Building Our First Bicep Template
Let’s look at a simple initial setup for SaaStronaut’s thumbnail-generating function app. We’ll need to create:
- A resource group
- An App Service Plan
- A storage account
- The Function App itself
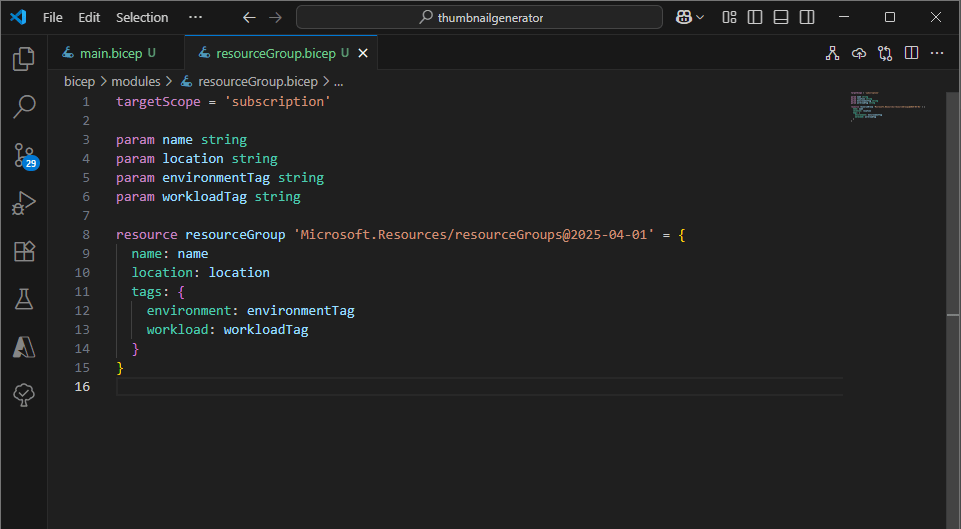
I’ll create a main.bicep file to hold our deployment logic. While I won’t dive deep into Bicep syntax here (saving that for a future post), I want to focus on a key codification concept: code reuse.
Sure, I could define all four resources directly in main.bicep. But what happens when I need a second function app or another storage account? Duplicating code is inefficient and error-prone. Instead, we want to reuse infrastructure code just like we do with application code.
Bicep Modules: Reuse Made Easy
Bicep supports modules, which allow us to define reusable templates for resources or groups of resources. These modules can be referenced by other templates to deploy consistent infrastructure.
Let’s see this in action for SaaStronaut.

My main.bicep file is lightweight—it contains four resource declarations, each referencing a separate module file.

Each module defines the Bicep code for a specific resource and accepts parameters for dynamic configuration. main.bicep passes in the required values to each module, allowing us to tailor each deployment.
Modules can also expose outputs, which are useful for passing values between resources. For example, I output the App Service Plan’s resource ID so it can be used as an input for the Function App module.

Infrastructure Code Meets Dev Workflows
With our initial Bicep framework in place, I can commit the templates to the repository alongside the application code. From there, the same workflows apply: linting, peer review, and pull requests.
This is the heart of DevOps—bringing Development and Operations together through shared tools, processes, and culture. Infrastructure is no longer a separate concern; it’s part of the codebase, versioned and validated just like any other component.
Wrapping Up the Code Phase
In this post, we took a hands-on journey through the Code phase of the DevOps lifecycle, applying key concepts to our SaaStronaut project. We started by structuring our application around microservices and mirrored that architecture with a micro-repository strategy. From there, we implemented branch policies to enforce clean, collaborative workflows and used EditorConfig to define and enforce consistent coding standards—both in the IDE and through command-line automation.
We didn’t stop at application logic. By introducing Infrastructure as Code with Bicep, we brought our infrastructure into the same development lifecycle, enabling version control, reuse, and peer review for our cloud resources. This alignment between development and operations is what makes DevOps transformative—it’s not just a methodology, it’s a mindset.
With our codebase and infrastructure now codified, linted, and policy-driven, we’re ready to move into the next phase: Build. In the upcoming post, we’ll explore how to automate compilation, testing, and packaging using Azure DevOps pipelines. We’ll look at how to validate our code, catch issues early, and prepare our artifacts for deployment—all while keeping speed and reliability front and center.
Thanks for following along as we bring SaaStronaut to life, one phase at a time. Stay tuned—the Build phase is where things really start to take off!
