
Ever heard the phrase “It works on my machine”? It’s the battle cry of countless developers—and the bane of every operations team. In the build phase of the DevOps lifecycle, we finally confront this problem head-on. This is where automation takes center stage, and we begin transforming raw code into reliable, running applications. In this article, we’ll walk through building a Continuous Integration (CI) pipeline using Azure DevOps, exploring how it accelerates development, enforces consistency, and sets the stage for everything that follows in your DevOps journey.

Let’s begin by unpacking what the build phase is all about. At its core, this phase takes the output from the coding stage and compiles it into executable libraries or deployable artifacts. But it’s not just about what we’re building—it’s about how and why. In this article, we’ll dive into creating an external, automated Continuous Integration (CI) pipeline. We’ll explore how CI accelerates development, ensures consistency, and lays the groundwork for future automation in later phases.
Why Consistency Matters
Modern IDEs are packed with features that allow developers to run code locally and validate changes in near real time. Many even integrate directly with cloud platforms, enabling seamless deployment to live environments for integrated testing. Because of this convenience, some teams deploy directly to production from their local environments—a major faux pas when it comes to consistency.
Local development environments are filled with custom packages and one-off configurations. Developers often use slightly different versions of tools and SDKs, and they tweak settings to quickly solve problems. This is normal—it’s part of the creative process. But these local dependencies rarely reflect a clean, production-ready environment. And that’s where the infamous “It works on my machine” problem rears its head. Something crashes in production, and the blame game begins.
CI as the Great Equalizer
A CI pipeline acts as a neutral third party. It builds the application in a controlled environment, resolving dependencies from scratch. If the code doesn’t work in CI, it doesn’t work—period. This eliminates the “works on my machine” excuse and keeps everyone aligned around a shared source of truth.
Let’s dig into what “Continuous Integration” really means. It’s about continuously merging work, ensuring that contributions from different team members integrate smoothly. If a change in one area breaks something elsewhere, the CI pipeline catches it. This is especially important when merging feature branches into the main branch. CI validates that everything works together before the pull request is approved.
Anatomy of a CI Pipeline
At its simplest, a CI pipeline consists of a trigger and a series of actions. The most common trigger is a commit to the repository—an indication that the code has changed and needs to be validated.
The actions that follow can be incredibly diverse. Most CI platforms support hundreds of integrated steps: compiling code, running unit tests, executing scripts, making API calls, interacting with cloud resources, publishing artifacts—you name it. As we progress through the DevOps lifecycle, we’ll incorporate more of these actions. But for now, our focus is on fast, reliable validation.
The Big Three: Compile, Lint, Test
To start, we’ll focus on three key actions:
- Compiling code to ensure it builds correctly
- Linting to enforce style and syntax standards
- Running unit tests to validate functionality
These steps help ensure that code can be safely merged and executed, and they provide quick feedback to the author.
Why is speed so critical? Imagine a developer makes a change, pushes it, and only finds out 45 minutes later that something broke. By then, they’ve moved on to another task. Now they have to switch back, fix the issue, and then reorient themselves to the new task again. These context switches are mentally taxing and time-consuming. A fast CI pipeline delivers feedback when it’s most valuable—before focus shifts.
CI in Action: The SaaStronaut Project
In our SaaStronaut project, we’ll implement a CI pipeline for each microservice. Every repository will have its own pipeline, triggered by commits. We’ll also integrate these pipelines into our branch policies from the code phase, requiring successful completion before any pull request can merge into the master branch.
This ensures that every piece of code entering production has passed through a rigorous, automated validation process—keeping our systems stable, our teams aligned, and our momentum strong.
Building a CI Pipeline for StarLog
Let’s take the StarLog application—the backend API for our SaaStronaut project—and get a CI pipeline off the ground.
For this, we’ll be using Azure DevOps Pipelines, which integrates beautifully with our existing Azure DevOps setup. Here’s why it’s a great fit:
- We can link pipeline runs and results directly to work items, commits, and pull requests.
- Azure Pipelines offer native connectivity to Azure services, where our applications will be hosted.
- We can configure pull requests to require a successful pipeline run before they’re allowed to merge.
These are just a few of the benefits of using a unified platform like Azure DevOps. That said, many tools in this space offer excellent cross-platform connectivity. For example, commits in GitHub can link to Jira work items and trigger pipelines in Azure DevOps.
Defining Pipelines as Code
The standout feature we’re leveraging here is the ability to define our pipeline as code. We’ll create a YAML file that specifies what our pipeline does and how it behaves. This file will live right in the repository alongside our application code.
Just as we codify infrastructure to treat it like application code, we’re extending that same philosophy to our CI pipeline definition.
Creating the Pipeline YAML File
We can create the YAML file from scratch locally, or we can use Azure DevOps to help scaffold it. I’ll start with Azure DevOps to streamline the process.
Within the SaaStronaut project in Azure DevOps, I navigate to the Pipelines section from the left-hand menu and am prompted to create my first pipeline.

Azure DevOps supports multiple code sources, but for this project, I’ll select Azure Repos Git.
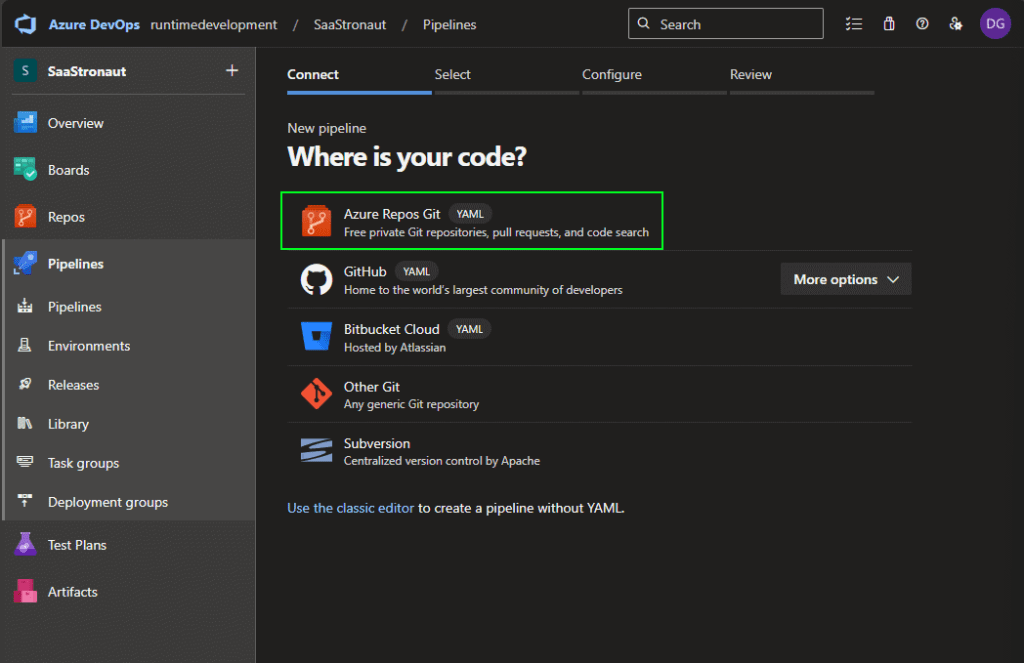
Next, I choose the repository I want to link to the pipeline. This step connects the repo to Azure DevOps so it knows where to look for the pipeline YAML file. While the file itself lives in the repo, Azure DevOps still needs to be told to expect it.
With the StarLog repo selected, I’m given the option to use an existing YAML file or start from a template. Since I haven’t defined the file yet, I’ll choose to start with a starter pipeline.

I’m presented with a basic pipeline shell. I can rename the file if needed—repos can contain multiple pipeline files for different workflows or triggers, so meaningful names help keep things organized.
Understanding the Core Pipeline Sections
Before customizing the pipeline, let’s break down its core components:
Trigger – This defines when the pipeline runs. The default is “main”, meaning it triggers on commits to the main branch. But there are many trigger types:
- CI triggers based on commits to branches, with fine-grained control using include/exclude lists or tags.
- Pull request triggers that run when a PR is opened or updated.
- Scheduled triggers for time-based execution.
- Pipeline triggers that run after another pipeline completes, enabling chaining.
For our purposes, we want the pipeline to run on all branches. I’ll update the trigger to use a wildcard (*) to cover everything.
Pool – The pool specifies the compute environment for the pipeline. We can choose between Windows or Linux, and even host our own agent. For simplicity, I’ll use the default managed agent with the ubuntu-latest image.
Steps – This section defines the actions the pipeline will perform. Steps can be grouped into stages and jobs for better organization and control.
Stages, Jobs, and Steps—A Quick Breakdown
- Stages: The highest-level grouping, often used to separate phases like Build, Test, Deploy to QA, and Deploy to Production. You can configure manual approvals between stages.
- Jobs: Units of work within a stage. Jobs can run in parallel on separate agents and define dependencies. For example, in a Test stage, you might have jobs for unit tests, integration tests, and security scans.
- Steps: The individual tasks—like running npm install, compiling code, or packaging artifacts.
The starter pipeline includes basic “Hello World” script steps. We’ll update these using the Assistant and the task list to reflect our actual build and test processes.

Expanding Our CI Pipeline: Restore, Build, Test, Lint, and Validate
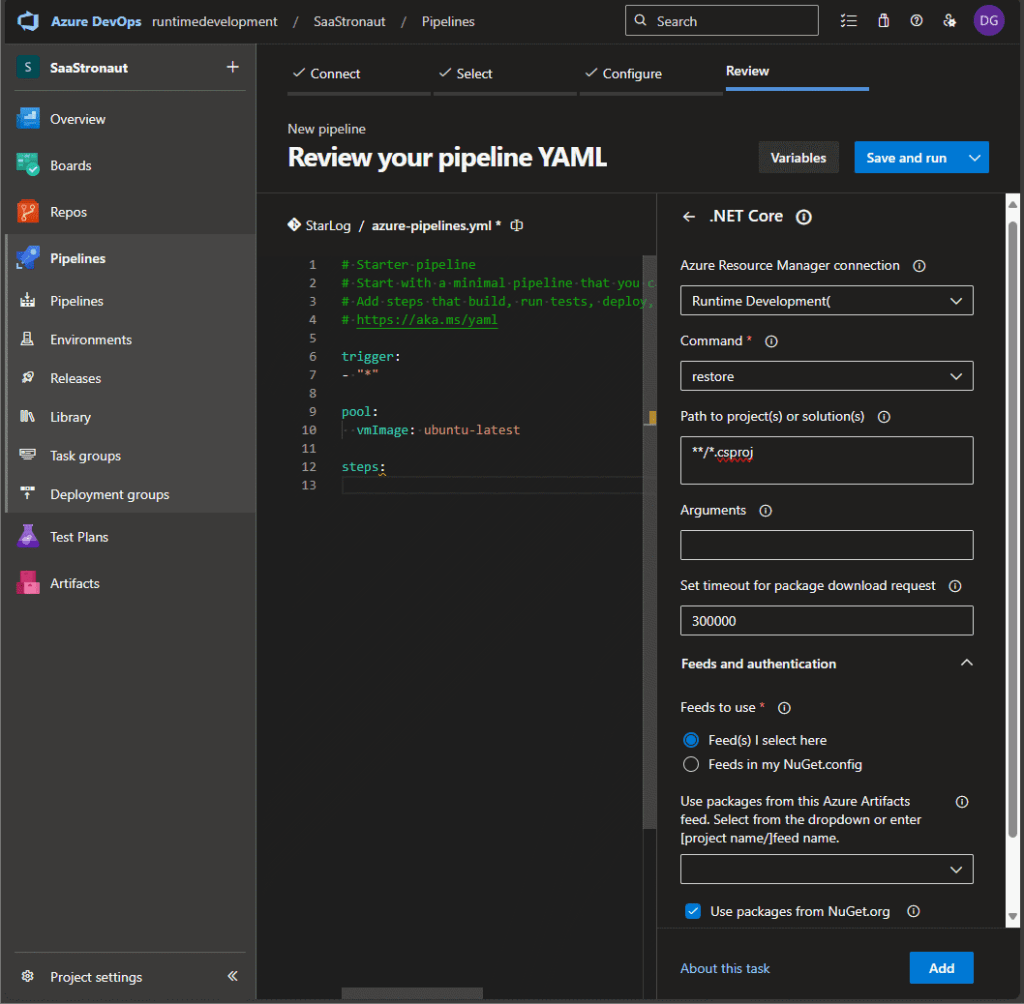
Let’s continue building out our CI pipeline for the StarLog application. First, I’ll update the steps to include a .NET Core task that restores NuGet packages and builds the application.
To do this, I remove the default script sections under steps, place my cursor in the steps section, and open the Assistant pane. I select the .NET Core task, choose the restore command, and configure the glob pattern for my .csproj file. Once everything is set, I click Add, and the appropriate values are inserted into my pipeline YAML file.

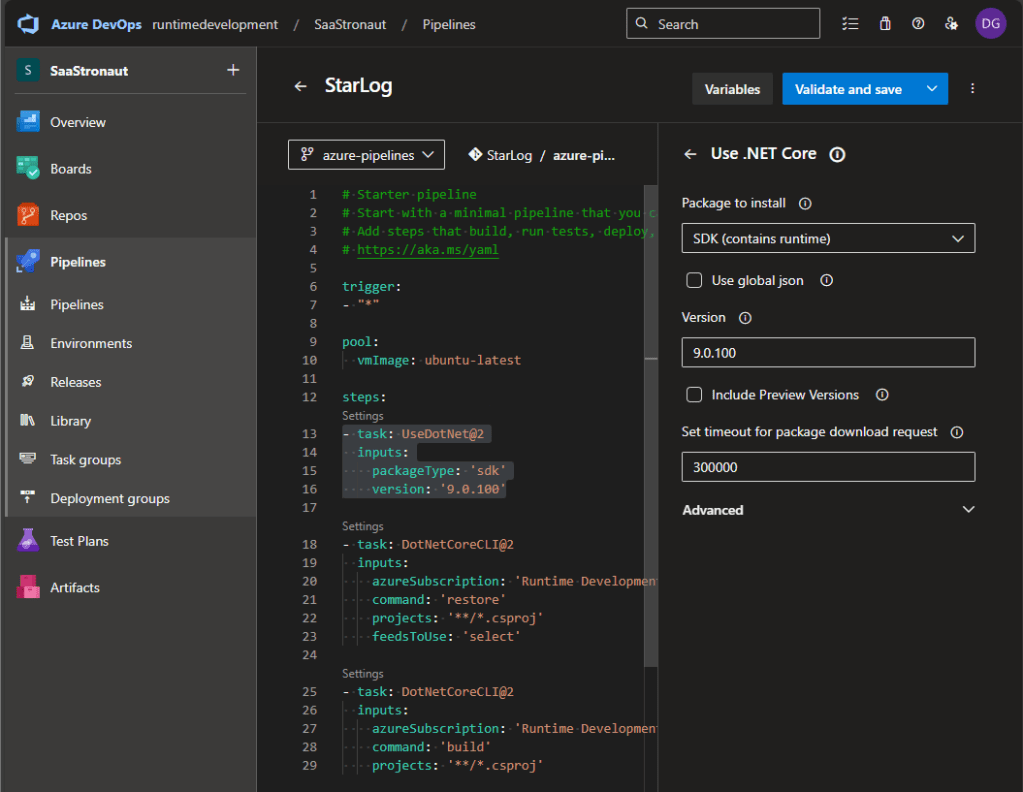
Next, I repeat the process to add a second .NET Core task to build the application. Because I’m using .NET 9, which isn’t included by default in the latest Ubuntu image, I also add a task to install the .NET 9 SDK. This becomes the first step in my pipeline.
Clicking Save and Run, I choose to create a new branch for this pipeline. I accept the default branch name and allow Azure DevOps to create a pull request for me.

Once the PR is merged into main and all subsequent feature branches, the pipeline will execute on every commit, validating that the code compiles with each change. I can view results from the Pipelines view in Azure DevOps and receive notifications if a pipeline fails.

Adding Unit Tests
Now let’s expand our CI pipeline to include unit tests. I’ve added a test project to the StarLog solution that contains relevant unit tests.
Navigating back to the pipeline in Azure DevOps, I continue editing with the help of the task assistant, committing changes directly to a branch.

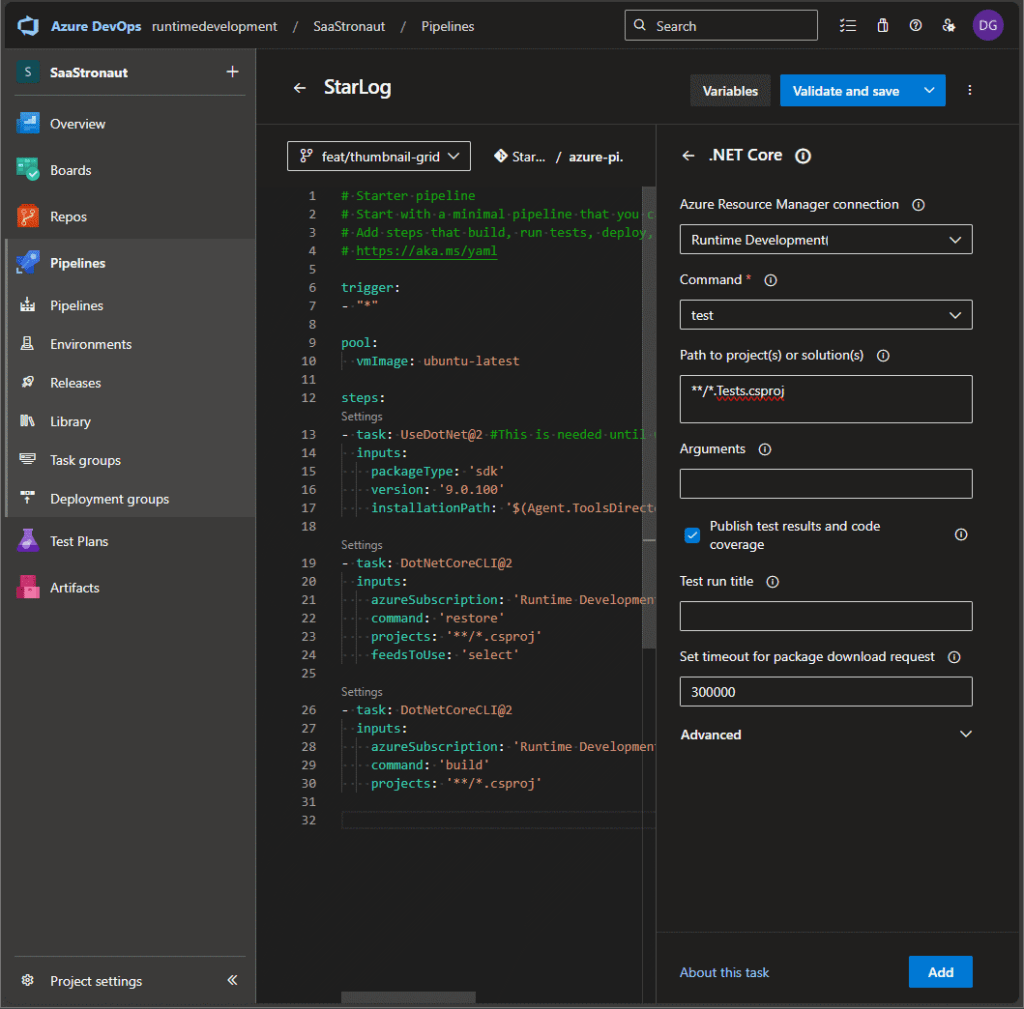
Below the existing tasks, I place my cursor and expand the task pane again. I select the .NET Core task, set the command to “test”, and define the glob pattern for my test project. I also enable test results and code coverage reporting. Once configured, I add the task to the pipeline and commit the changes. Thanks to our trigger condition, the pipeline runs immediately.
After the run completes, I navigate to the pipeline execution details to view the test results. I can see which tests ran and their outcomes. Most importantly, if a unit test fails, the pipeline fails—and I’m notified right away so I can fix the issue before it reaches production.

Enforcing Linting Standards
As a final task for now, let’s add linting using EditorConfig. (If you need a refresher on linting, check out my earlier article on the code phase.)
Linting is handled via the dotnet format command. We’ll use the same .NET Core task, but this time configure it to run a custom command: format with the argument --verify-no-changes. This causes the tool to exit with a non-zero code if formatting issues are found, which Azure DevOps interprets as a pipeline failure.
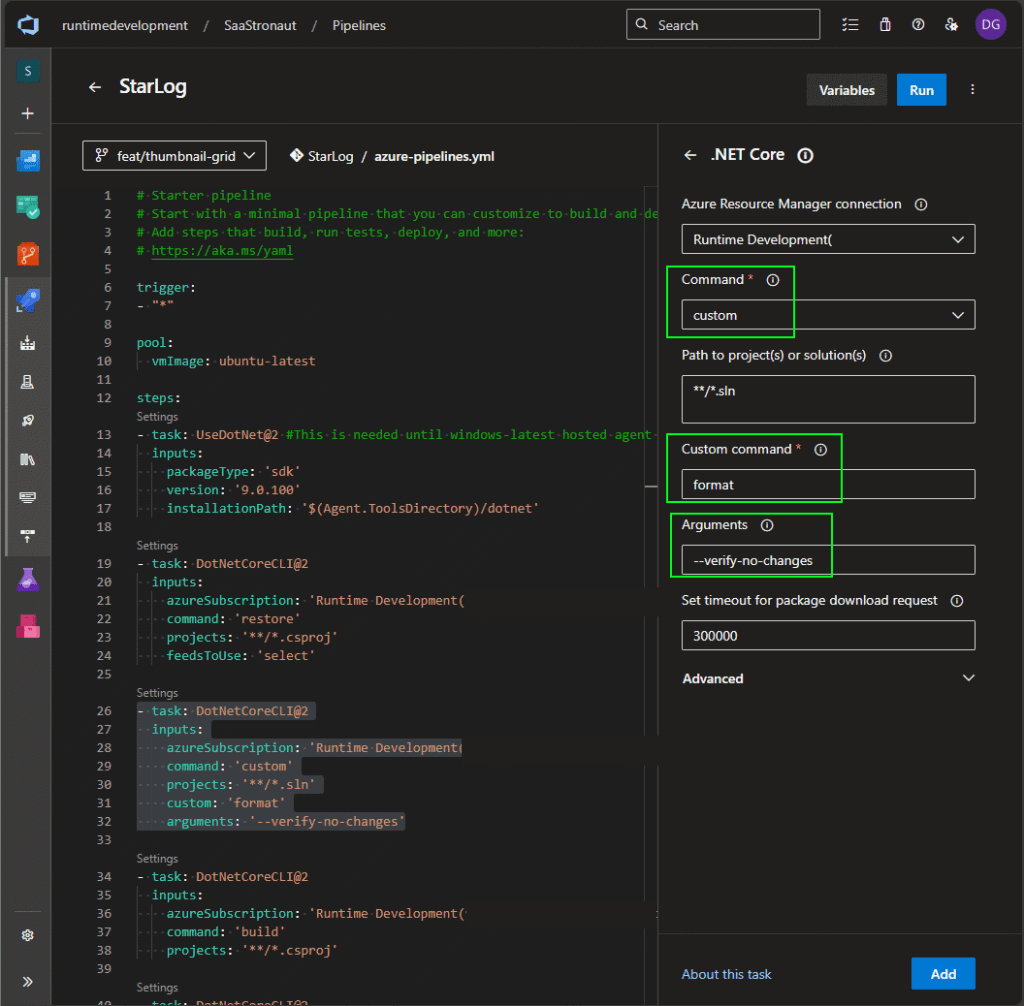
If a commit includes formatting violations, the pipeline step fails and the output shows detailed validation errors.

As a developer, I’m notified that linting has failed. I can fix the issues, push a corrected version, and once the code meets our team’s standards, the build passes.
Enforcing Build Validation via Branch Policies
With our pipeline fully configured, the final step is to add it as a build validation requirement for pull requests. This is done via branch policies.
In Azure DevOps, I navigate to Project Settings, select Repositories from the left-hand menu, and choose the repository I want to protect. In SaaStronaut, each repo has its own pipeline, so I’ll define this policy separately for each one.

With the repo selected, I go to the Policies tab. At the bottom, I find Branch Policies and select the main branch.

In the branch policies menu, I scroll to the Build Validation section and click the plus icon to add a pipeline.

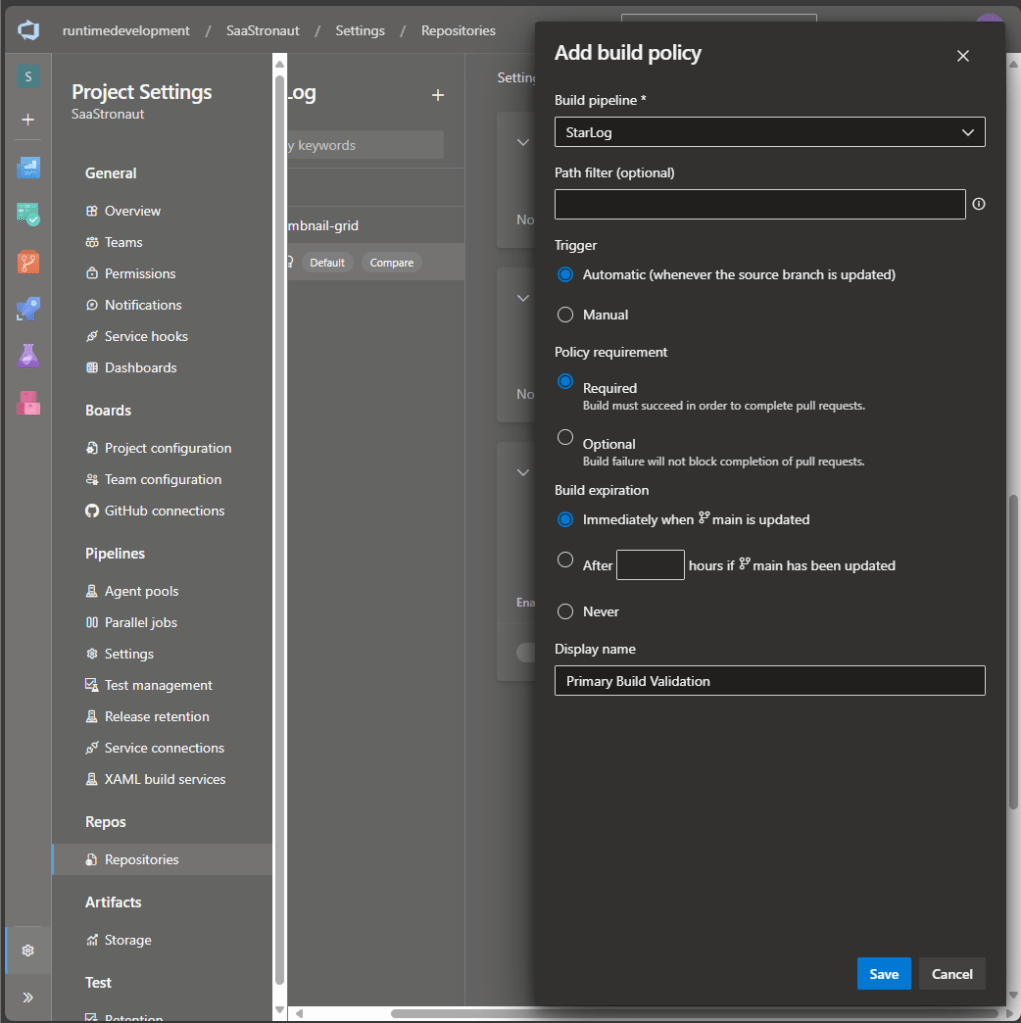
I select the StarLog pipeline we’ve built. There are several settings to fine-tune the policy:
- I leave the path filter blank to apply the policy to all changes.
- I mark the pipeline as required to complete a pull request.
- I set the option to expire previous builds immediately if a new commit is pushed.
One of the best features here is that the pipeline runs against the merged result of the pull request. This means we validate the combined code from the feature branch and main before the PR is completed—catching integration issues before they hit production.
I also provide a display name for the policy to make it easier to identify, especially if multiple validations are in place. Once everything looks good, I save the policy.

Seeing It in Action
Let’s open a new pull request and watch the policy in action. As soon as the PR is created, the pipeline is triggered. Azure DevOps displays all required validations, and I can expand the list to view details or click directly into the pipeline run to see logs and status.

Once the pipeline completes successfully, the validation is marked as passed. If it had failed, the PR would be blocked until the issue was resolved and a new commit triggered another run. Once the build passes, I can complete the PR and merge the code into main.

Wrapping Up
And there you have it—a clean, effective CI pipeline implementation for our repository.
we’ve laid a solid foundation for reliable, automated software delivery. This setup ensures:
- Code compiles cleanly in a consistent environment
- Style standards are enforced through linting
- Unit tests validate functionality with every commit
- Fast feedback minimizes costly context switching
- Pull requests are protected by build validation policies
Together, these steps eliminate the “works on my machine” problem and keep your team focused on building high-quality software that works everywhere it matters.
If you’ve followed along, you’ve just built a robust CI pipeline—one that’s not only technically sound but also scalable and ready to evolve into a full CI/CD workflow. That’s no small feat.
Next up: the test phase, where we turn validation into confidence and start measuring what matters. Thanks for joining me on this leg of the DevOps journey—see you in the next article, and until then, keep shipping smart and stay agile.
